 Save to Pinterest
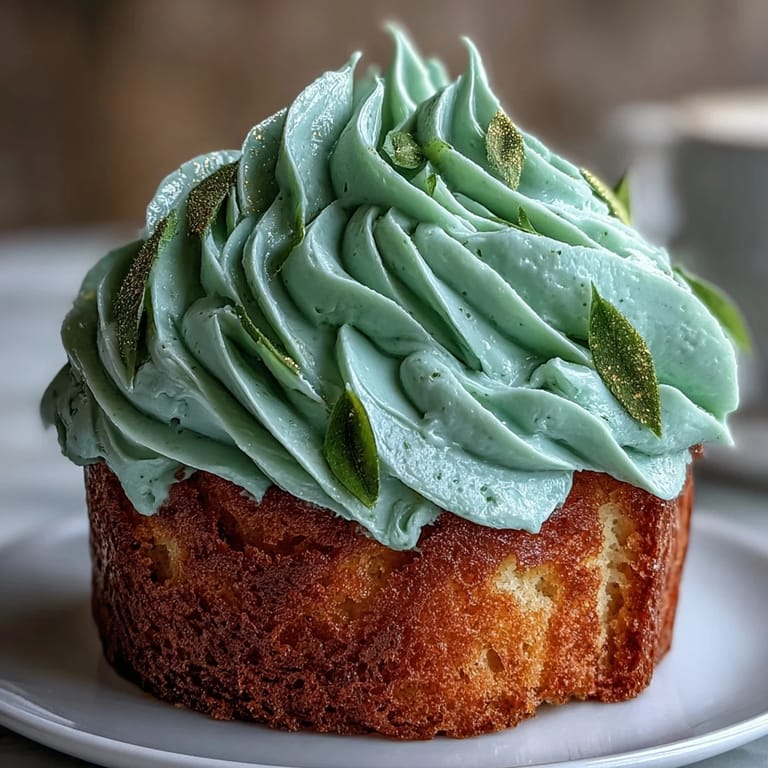
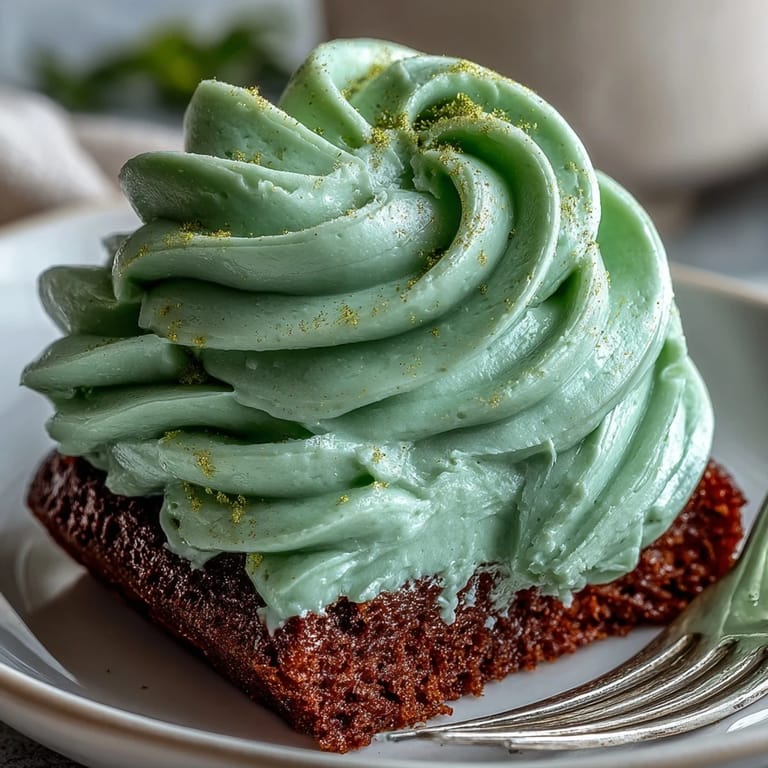
 There’s something oddly meditative about transforming a blank, golden sheet cake into a grad party showstopper. I still remember the soft hiss of parchment as I smoothed it into the pan and how my kitchen filled with the vanilla bean’s warm scent that first time I tried my hand at sage green and gold buttercream. Piping those gold-tipped swirls, I learned it’s all in the wrist – and that a little edible shimmer can turn an ordinary dessert into a centerpiece. No matter how many times I’ve baked for milestones, this particular tradition feels special with every celebration. Decorating brings a mix of anticipation and quiet focus that sets the tone for every graduation gathering.
Once, just as I finished piping on the last of the gold scrollwork, my favorite teacher from high school popped by unexpectedly for my cousin’s graduation. I watched everyone’s eyes light up as the cake appeared, each person holding their phones, eager to capture the creation before it vanished slice by slice. We lingered around the kitchen island, forks in hand, and somehow the tidy squares just kept disappearing. Frosting smudges and laughter felt like their own rite of passage that afternoon. That’s when I realized this recipe was more than just a dessert – it became a gathering point for stories and goodbyes.
Ingredients
- All-purpose flour: Go for unbleached flour to keep your cake tender and prevent it from tasting chalky – a trick I picked up after one lackluster batch.
- Baking powder: This ensures each bite has a delicate, even rise, but measure with care or the cake can get too airy.
- Salt: Just a pinch sharpens the sweetness and balances the flavors, so don’t skip it even if it seems small.
- Unsalted butter: Let it come completely to room temperature for a perfectly smooth batter and silkiest buttercream.
- Granulated sugar: Creaming it well with the butter creates the fluffy base that carries the vanilla notes throughout.
- Eggs: Using room temperature eggs helps the batter emulsify and keeps the texture even with every forkful.
- Pure vanilla extract: This is what brings subtle warmth and nostalgia into each bite – use real extract for the best flavor.
- Whole milk: It supplies just enough richness to keep the crumb moist, so don’t swap it out for reduced-fat unless you must.
- Powdered sugar: Always sift it before adding to butter, trust me – unsifted sugar causes lumpy, uneven frosting.
- Heavy cream or milk: Adding it little by little lets you control the buttercream’s texture until it’s perfect for spreading.
- Sage green gel food coloring: Just a tiny dab goes far in creating that serene hue; start light and build up color gradually.
- Gold edible luster dust: Painting the gold accents is insanely gratifying and instantly elevates the whole look; mix with clear vanilla for the smoothest finish.
- Clear vanilla extract or vodka: Mixing the dust with a splash makes it brushable and dries quickly without a lingering aftertaste.
Tired of Takeout? 🥡
Get 10 meals you can make faster than delivery arrives. Seriously.
One email. No spam. Unsubscribe anytime.
Instructions
- Prepare the pan:
- Grease and line a 12 × 18 inch sheet pan with parchment – listen for the gentle wrinkle as it settles flat so you avoid sticking later.
- Mix dry ingredients:
- Whisk flour, baking powder, and salt in a bowl, breathing in the faint nutty aroma that comes from fresh flour.
- Cream butter and sugar:
- Beat them until light and fluffy; you’ll know you’re there when the color pales and it feels pillowy under your spatula.
- Add eggs and vanilla:
- Beat in eggs one by one, then pour in vanilla – the kitchen air changes as the batter turns glossy.
- Combine dry and wet:
- Add the flour in thirds, with milk in between, gently folding until barely incorporated so the cake stays soft.
- Bake:
- Spread the batter smoothly and bake for 28–32 minutes; your kitchen will smell cozy and the top will spring back lightly to your touch when it’s done.
- Make buttercream:
- Beat butter until creamy, then slowly add powdered sugar; watch the mixture turn billowy, adding cream to finesse the texture.
- Tint and reserve:
- Add sage green coloring bit by bit to most of the buttercream, reserving ½ cup for gold details that come next.
- Frost the cake:
- Once cool, swoosh the sage frosting over the cake, corners and all, letting the spatula create satisfying ridges and valleys.
- Add gold accents:
- Mix gold luster dust with a touch of clear vanilla and paint over piped details, or swirl into reserved buttercream before adding final touches.
- Decorate:
- Create graduation symbols with piping or sprinkles and let your creativity run wild; take a step back and admire your handiwork before serving.
 Save to Pinterest
  Save to Pinterest
 At my sister’s celebration, we ended up sitting on the porch long after everyone had left, quietly eating leftover slices as the sun dipped behind the trees. The hum of summer bugs and a little gold shimmer on our fingers made the night feel quietly triumphant, like the transition was just beginning for all of us.
Make-Ahead and Storage
I’ve learned that baking the sheet cake the night before actually improves the flavor, giving all those subtle vanilla tones a chance to deepen. Storing leftovers in an airtight container keeps the buttercream fluffy for up to three days, and a quick chill perks up any drying edges without sacrificing moistness.
Personalizing Your Graduation Cake
Tweaking this cake for your grad’s favorite color or flavor is part of the fun – I’ve swapped in lemon zest or almond extract and accented with colored sprinkles for extra personality. Even imperfect piping ends up looking festive surrounded by confetti and laughter.
Troubleshooting and Finishing Touches
Sometimes, my first attempt at gold accents went lopsided, but blending a little extra white buttercream with gold dust smoothed things out quickly. Imperfections tend to disappear once the cake is sliced and celebrated.
- Don’t rush cooling or your frosting will melt into a puddle.
- Test food color in a small dollop of buttercream for the ideal sage shade.
- Have a food-safe brush ready for crisp, gleaming gold accents.
 Save to Pinterest
 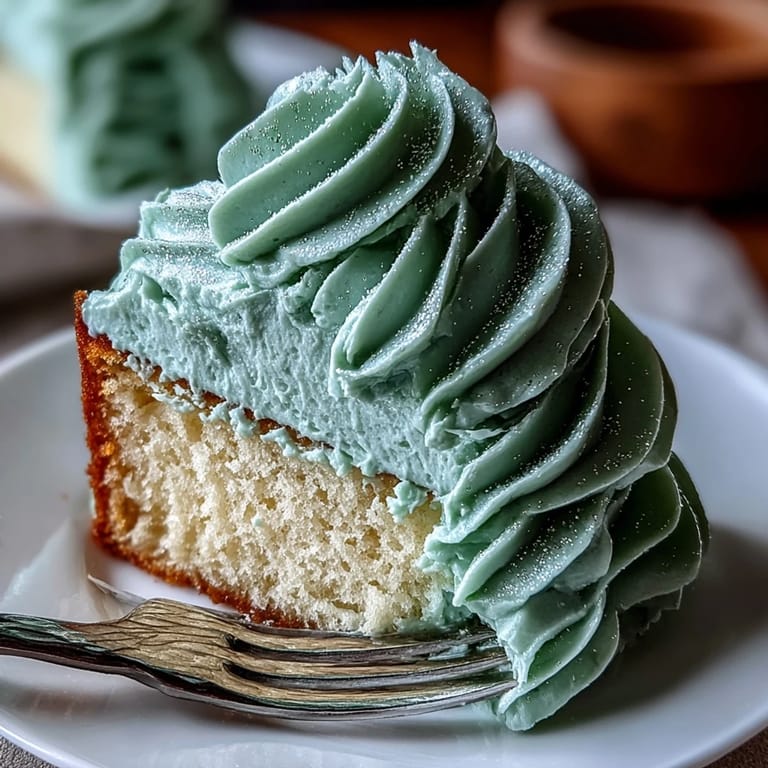 Save to Pinterest
 However you decorate it, this cake will bring people together in all the best ways – may each slice taste like accomplishment and possibility.
Recipe FAQs
- → How do I ensure the sheet is moist?
Cream the butter and sugar until light, alternate the dry ingredients with room-temperature milk, and avoid overmixing once combined. Bake until a toothpick comes out clean and cool completely in the pan to retain moisture.
- → Best way to tint the buttercream sage?
Use gel food coloring for concentrated hue; add a little at a time and mix thoroughly. Let the frosting rest a few minutes—colors often deepen as they sit.
- → How can I get a smooth, spreadable buttercream?
Beat room-temperature butter until creamy, add sifted powdered sugar gradually, and incorporate heavy cream one tablespoon at a time until desired texture. If too soft, chill briefly and rewhip to smooth.
- → What’s the safest way to make edible gold accents?
Mix edible luster dust with a few drops of clear vanilla extract or vodka to form a paint, then brush onto reserved buttercream details. Alternatively, blend dust into softened buttercream for a marbled metallic finish.
- → Can I adapt flavors or make a gluten-free version?
Swap extracts—lemon, almond, or chocolate—to vary the profile. For gluten-free, use a 1:1 gluten-free flour blend, noting texture may differ and bake times could vary slightly.
- → How should I store and slice the sheet?
Store covered in the refrigerator for up to 3 days. Chill before slicing to get neat squares, then bring to room temperature for serving so the buttercream softens.