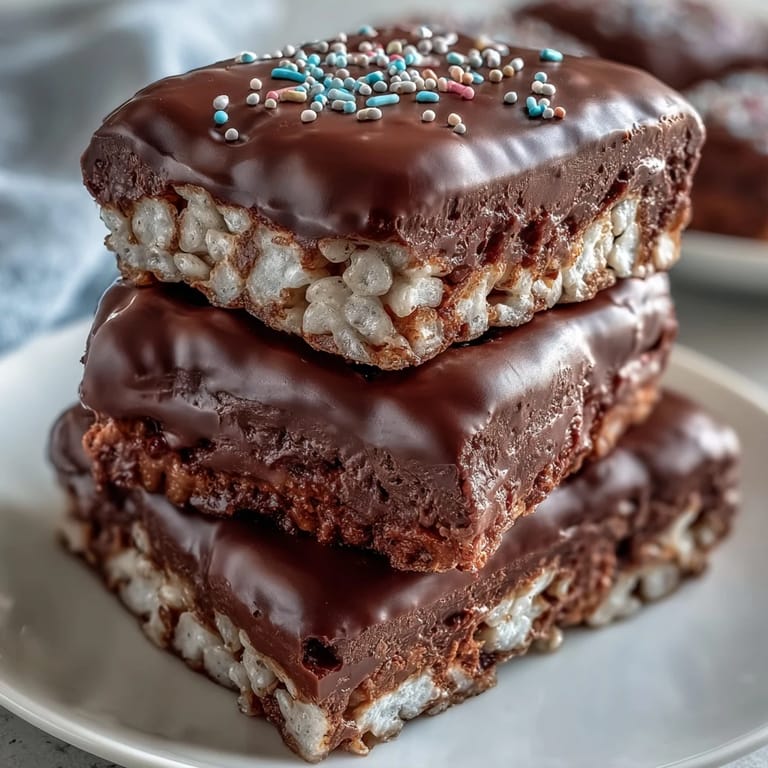
 Save to Pinterest
 My kitchen counter was a disaster zone the afternoon I decided to upgrade my usual Rice Krispies treats. Melted marshmallow clung to the spatula, chocolate smudged the edge of the pan, and rainbow sprinkles had somehow scattered across the floor. But when I pulled that first bar free and bit through the glossy chocolate shell into the sweet, crispy layer beneath, I knew the mess was worth every second. These treats became my go-to whenever I needed something impressive that didn't require an oven or any real baking skill.
I brought a batch to a potluck once, stacked on a plain white platter and dusted with sprinkles. They disappeared faster than the elaborately frosted cupcakes someone else had spent all morning decorating. A neighbor asked if I'd used a secret ingredient, and I just laughed because the magic was really in the chocolate glaze and the way it hardened into that satisfying snap. Since then, I've made these for birthdays, bake sales, and quiet weeknight cravings when I need something sweet without the fuss.
Ingredients
- Unsalted butter: Melts the marshmallows smoothly and adds richness without making the treats greasy, plus you control the salt level.
- Mini marshmallows: Melt faster and more evenly than large ones, creating that gooey binder that holds every puffed rice grain in place.
- Rice Krispies cereal: The classic crispy base that gives these treats their signature snap and airy texture.
- Fine sea salt: A small pinch balances the sweetness and makes the chocolate topping taste even more luxurious.
- Semisweet or dark chocolate chips: Choose based on how sweet you want the finish, dark chocolate adds a grown-up edge while semisweet stays familiar.
- Vegetable oil or coconut oil: Thins the melted chocolate just enough to spread smoothly and creates that professional glossy sheen.
- Rainbow sprinkles or chopped nuts: Optional garnish that adds color, crunch, or both depending on your mood and audience.
Tired of Takeout? 🥡
Get 10 meals you can make faster than delivery arrives. Seriously.
One email. No spam. Unsubscribe anytime.
Instructions
- Prep the pan:
- Grease your baking pan generously with butter so the finished treats lift out cleanly. If you have parchment paper, line the pan and let it hang over the edges for easy removal later.
- Melt the butter:
- Use low heat and stir constantly to keep the butter from browning, which would add an unwanted nutty flavor. The gentle melt ensures a smooth base for your marshmallows.
- Add and melt marshmallows:
- Stir the mini marshmallows into the melted butter and keep stirring until they turn into a smooth, glossy pool. This takes a few minutes, so be patient and don't crank up the heat.
- Season the mixture:
- Remove the pan from heat and stir in the sea salt if using. This is also the moment to add vanilla extract if you want an extra layer of flavor.
- Fold in cereal:
- Add the Rice Krispies all at once and fold gently with a spatula until every piece is coated in marshmallow. Avoid crushing the cereal by using a light touch.
- Press into pan:
- Transfer the mixture to your prepared pan and press it down evenly using a buttered spatula or lightly greased hands. Firm pressure creates bars that hold together, but don't compact them so much that they lose their airy crunch.
- Cool briefly:
- Let the pressed layer sit at room temperature for about 10 minutes so it firms up slightly before you add the chocolate. This prevents the chocolate from sinking into the cereal.
- Melt the chocolate:
- Combine chocolate chips and oil in a microwave-safe bowl, then heat in 30-second bursts on medium power, stirring after each interval. The oil helps the chocolate stay smooth and spreadable.
- Pour and spread:
- Pour the melted chocolate over the cooled cereal layer and spread it evenly with an offset spatula or the back of a spoon. Work quickly before the chocolate begins to set.
- Add garnish:
- Sprinkle rainbow sprinkles or chopped nuts immediately while the chocolate is still wet so they stick. This is your chance to make them as festive or elegant as you like.
- Set the chocolate:
- Let the treats sit at room temperature for at least an hour, or pop them in the fridge for 20 to 30 minutes if you're in a hurry. The chocolate needs to harden completely before you cut.
- Cut into bars:
- Lift the block out using the parchment overhang or invert the pan onto a cutting board, then use a sharp knife to slice into 12 to 16 bars. Wipe the blade between cuts for clean edges.
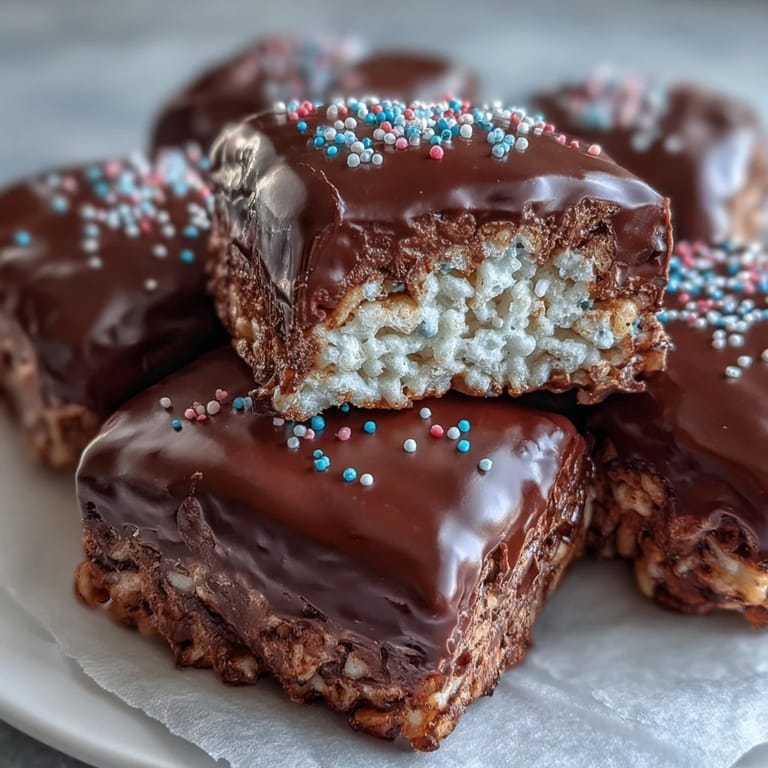
 Save to Pinterest
 One evening, I made a double batch for my daughter's school fundraiser and packaged them in clear cellophane bags tied with ribbon. A teacher told me later that kids were trading lunch items just to get one of those chocolate-topped bars. It reminded me that sometimes the simplest recipes, dressed up just a little, can feel like the most generous gifts. These treats carry memories of childhood but taste polished enough to impress anyone.
Storing and Serving
Keep your finished bars in an airtight container at room temperature for up to three days, stacking them between sheets of parchment to prevent sticking. If your kitchen runs warm or you want them to last longer, store them in the fridge for up to a week, though the chocolate may lose a bit of its glossy finish. Before serving, let refrigerated bars sit out for a few minutes so the chocolate softens slightly and the flavors open up. I like to arrange them on a platter just before guests arrive so they look fresh and inviting.
Flavor Variations
Swap semisweet chocolate for white chocolate and use pastel sprinkles for a springtime or Easter version that feels lighter and sweeter. Stir a half teaspoon of vanilla extract or a pinch of espresso powder into the melted marshmallows to deepen the flavor without changing the texture. For a grown-up twist, sprinkle flaky sea salt over the wet chocolate instead of sprinkles, or drizzle melted peanut butter over the chocolate layer before it sets. I've even folded mini chocolate chips or toffee bits into the cereal mixture itself for extra pockets of sweetness.
Troubleshooting and Tips
If your marshmallow mixture hardens before you finish pressing it into the pan, return it to low heat for a few seconds to soften it again. Chocolate that seizes or turns grainy usually means it got too hot or came into contact with water, so keep your bowl and utensils completely dry. When cutting, a pizza cutter can work just as well as a knife and sometimes gives you more control for even squares.
- Line your pan with parchment for foolproof removal and easier cleanup afterward.
- Use a silicone spatula when folding cereal into marshmallow because it won't stick as much as other materials.
- Let the finished bars come to room temperature before serving if they've been refrigerated, the texture and flavor are better that way.
 Save to Pinterest
 Every time I make these, I'm reminded that you don't need fancy techniques or expensive ingredients to create something people remember. A little butter, some marshmallows, crispy cereal, and a layer of good chocolate can turn an ordinary afternoon into something sweet and worth sharing.
Recipe FAQs
- → How long do these treats stay fresh?
Store in an airtight container at room temperature for up to 3 days, or refrigerate for up to a week. The chocolate may lose its gloss if refrigerated but will still taste delicious.
- → Can I use different types of chocolate?
Absolutely! Semisweet, dark, milk chocolate, or even white chocolate work beautifully. Just keep in mind that white chocolate sets more quickly and may require slightly less oil.
- → Why add oil to the chocolate?
The oil helps the chocolate melt smoothly and creates a glossy, professional-looking finish that sets firmly without becoming too hard or brittle.
- → How do I prevent the cereal mixture from sticking to my hands?
Butter your hands or spatula lightly before pressing the mixture into the pan. This prevents sticking and helps create an even, compact layer.
- → Can I make these ahead of time?
Yes! These bars actually taste better after sitting for a few hours as the flavors meld. Make them up to 2 days before your event for best results.
- → What's the best way to cut clean bars?
Let the chocolate set completely at room temperature or in the refrigerator. Use a sharp knife warmed under hot water, wiping clean between cuts for perfect edges.