 Save to Pinterest
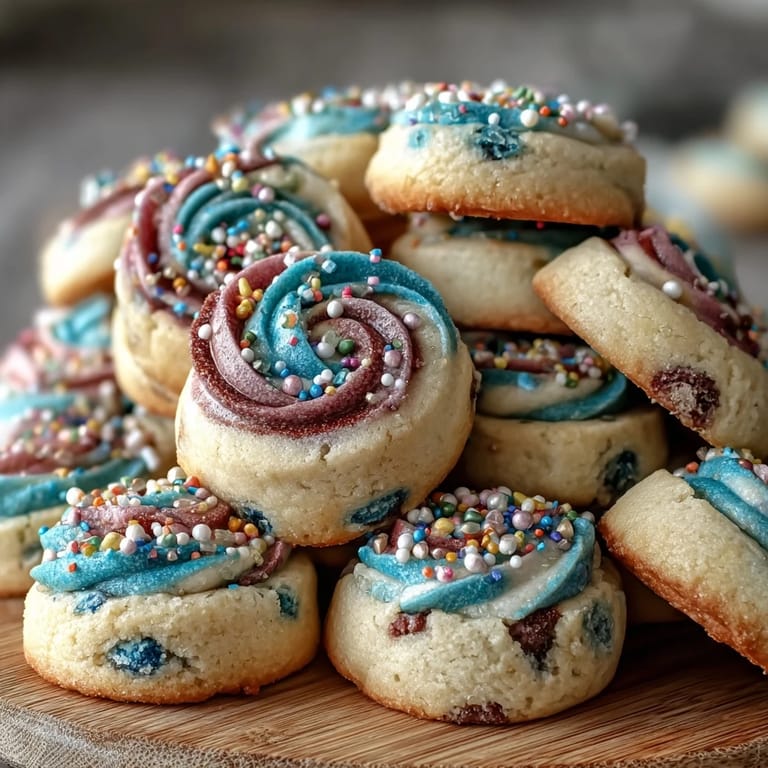
 My niece turned seven last month, and she was obsessed with Cookie Run Kingdom—those adorable little characters that run through her tablet screen. When she asked if I could bake cookies that looked like them, I spent an afternoon experimenting with pastel swirls and twisted doughs, discovering that the most magical thing about these cookies isn't just how they look, but how they bring that whimsical game world right onto a plate. The moment she saw the finished batch with their soft, buttery centers and dreamy color combinations, her eyes lit up in a way that made every extra minute of chilling time completely worth it.
I remember standing in my kitchen at 9 PM on a Thursday, my hands stained with gel food coloring (lavender and pink), twisting ropes of dough while my sister watched and laughed at how serious I'd gotten about cookie aesthetics. She kept saying they looked like edible jewelry, and by the time I pulled the first batch from the oven, the whole apartment smelled like vanilla and butter in a way that made even her skepticism crumble. Watching her steal one before they'd fully cooled, leaving a trail of crumbs and pastel sprinkles across the counter, I knew I'd stumbled onto something special.
Ingredients
- All-purpose flour (2 1/2 cups): This is your structural backbone—it keeps the cookies tender rather than cakey, and measuring by weight instead of volume prevents the flour-heavy density that ruins homemade cookies.
- Unsalted butter (1 cup, room temperature): Cold butter creates dense cookies, but room temperature butter creams into fluffy clouds that trap air and make these genuinely melt-in-your-mouth.
- Granulated sugar (1 cup): The sweet structure that caramelizes at the edges and keeps the centers soft—don't skip this for something else.
- Gel food coloring (pink, blue, yellow, lavender): Gel is non-negotiable here because liquid coloring adds moisture and turns your swirls muddy; gel keeps the colors punchy and the dough dry.
- Baking powder (1/2 tsp): Just enough to give these a subtle lift without making them cakey or puffy.
- Egg (1 large): Your binding agent and the ingredient that gives these their characteristic tender crumb.
- Vanilla and almond extracts: Vanilla is the workhorse; the almond extract is optional but adds a subtle bakery-quality depth that makes people ask what your secret ingredient is.
- Pastel sprinkles: These aren't strictly necessary, but they're the finishing touch that makes these look like they came from a professional bakery.
Tired of Takeout? 🥡
Get 10 meals you can make faster than delivery arrives. Seriously.
One email. No spam. Unsubscribe anytime.
Instructions
- Prepare your dry ingredients:
- Whisk together flour, baking powder, and salt in a medium bowl and set it aside—this prevents lumps from forming when you add the wet ingredients and ensures even leavening throughout.
- Cream butter and sugar together:
- Beat them for 2-3 minutes until the mixture goes from grainy and dense to pale yellow and fluffy—this is the most important step because you're aerating the dough. If you rush this, your cookies will be dense and sad.
- Add the egg and extracts:
- Mix until completely combined, scraping down the bowl a few times—this takes maybe a minute, and you'll notice the mixture becoming smoother and glossier.
- Bring dry and wet together:
- Add the flour mixture gradually while mixing on low speed, stopping as soon as you don't see any white streaks of flour—overmixing toughens the cookies and no one wants that. Your dough should come together in loose clumps.
- Divide and color your dough:
- Split the dough into 3 or 4 portions depending on how many colors you want, then add a drop or two of gel food coloring to each portion and knead gently until the color distributes evenly. Don't overwork it, or the dough gets tough.
- Roll colored portions into ropes:
- Work each portion into a rope about 12 inches long and roughly the thickness of a fat marker—they don't need to be perfect because the rustic variation is actually part of their charm.
- Twist and create your log:
- Lay the ropes side by side and gently twist them together in a spiral, then roll the twisted bundle into a cohesive log—imagine you're braiding hair in the gentlest way possible, because rough handling dulls the color definition you worked for.
- Chill thoroughly:
- Wrap the log in plastic wrap and refrigerate for at least 2 hours—this firms up the butter so the swirls hold their definition when you slice and bake. I've learned the hard way that rushing this step means your cookies spread into formless puddles.
- Slice and arrange:
- Preheat your oven to 350°F and line baking sheets with parchment paper, then slice the chilled log into 1/4-inch thick rounds and space them about 2 inches apart on the sheet. The rounds should look like little edible stained glass windows.
- Top and bake:
- Add pastel sprinkles if you want them, then bake for 10-12 minutes until the edges just barely turn golden—the centers should still look slightly soft, and this is not the time to be brave. Overbaked cookies are dry cookies, and we're not making those here.
- Cool with patience:
- Leave them on the baking sheet for 5 minutes before moving to a wire rack—this resting period lets them set without becoming brittle, and those first few minutes when they're still warm but firm is the ideal window for stealing one before they're officially finished.
 Save to Pinterest
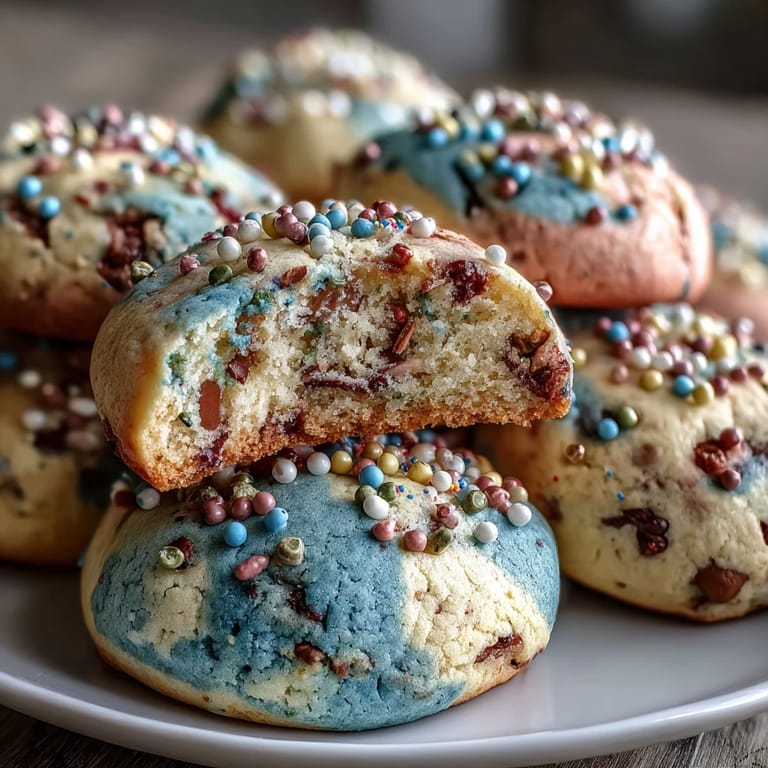
 There's something deeply satisfying about pulling a tray of these cookies from the oven and realizing that your pastel swirls stayed intact, creating these miniature works of edible art that somehow taste even better than they look. When my niece sat at the table with a cookie in each hand, deciding which color combination to eat first, I understood why people bake—it's not really about the sugar and butter, it's about creating moments that stick with people.
The Science of Soft Cookies
The secret to these cookies' tender crumb lies in the balance between flour and fat, plus the creaming step that incorporates air into the dough. When you cream room-temperature butter with sugar, you're creating millions of tiny air bubbles that expand during baking, giving these their signature soft texture. Resist the urge to add extra flour if the dough feels sticky—that moisture is what keeps them from becoming hard little pucks after a day or two of sitting.
Color and Presentation Tricks
Gel food coloring comes in tiny bottles for a reason—you only need a toothpick-sized dab to create vibrant pastels, so resist the temptation to squeeze generously or your colors will be aggressive instead of soft. The twist technique works because it creates natural marbling that looks intentional and sophisticated without requiring you to be a decorating expert. If you want even more visual impact, try using only two colors and twisting them tighter for more defined stripes, or loosely twist three colors for a dreamy, watercolor effect.
Storage and Make-Ahead Wisdom
These cookies keep beautifully in an airtight container at room temperature for up to 5 days, staying soft throughout if you include a slice of bread in the container to absorb excess moisture—I learned this trick from my grandmother and it genuinely works. You can also freeze the unsliced dough log for up to 2 months, meaning you can slice and bake fresh cookies on a whim without starting from scratch.
- For even softer cookies the next day, cover the container loosely to let them reach equilibrium moisture rather than keeping them vacuum-sealed.
- If cookies start to harden, wrap them in a damp paper towel and microwave for 10 seconds to restore their softness temporarily.
- The first 24 hours are peak texture—after that they're still good, but the butter-soft magic fades slightly.
 Save to Pinterest
 These cookies are proof that the most memorable desserts don't need to be complicated—they just need to be made with attention and a little playfulness. Bake them for someone's birthday, or bake them for yourself on an ordinary Tuesday when you need a reminder that small, beautiful things matter.
Recipe FAQs
- → What causes the pastel swirls in these cookies?
The swirls come from dividing the dough into portions tinted with pastel gel food coloring, then gently twisting the ropes together.
- → Why is chilling the dough important?
Chilling firms the dough, making the slices hold their shape during baking and enhancing flavor melding.
- → Can I substitute almond extract in this treat?
Yes, almond extract is optional and can be omitted or replaced with other extracts like lemon for varied flavor.
- → How should these cookies be stored?
Store in an airtight container at room temperature for up to five days to maintain freshness.
- → What is the best way to achieve vibrant pastel colors?
Use gel food coloring, which provides bright hues without altering the dough consistency.
- → Can these treats be frozen?
Yes, they freeze well for up to two months when stored properly in an airtight container.